Quantcast
Channel: reverse engineering – Hackaday
Viewing all 364 articles
Browse latest View live

Reverse Engineer PCBs with SprintLayout

$
0
0

[Bwack] had some scanned pictures of an old Commodore card and wanted to recreate PC boards from it. It’s true that he could have just manually redrawn everything in a CAD package, but that’s tedious. Instead, he used SprintLayout 6.0 which allows you to import pictures and use them as a guide for recreating a PCB layout.

You can see the entire process including straightening the original scans. There are tools that make it very easy to place new structures over the original scanned images.

One might think the process could be more automated, but it looks as though every piece needs to be touched at least once, but it is still easier than just trying to eyeball everything together.

Most of the video is sped up, which makes it look as though he’s really fast. Your speed will be less, but it is still fairly quick to go from a scan to a reasonable layout.

The software is not free, but you can do something somewhat similar in KiCAD. The trick is to get the image scaled perfectly and convert it to a component on a user layer. Then you can add the new component and enable the user layer to see the image as you work. There’s even a repository of old boards recreated in KiCAD.

There are probably an infinite number of ways to attack this. An older version of SprintLayout helped with the Re-Amiga 1200.


Reverse Engineering Yokis Home Automation Devices

$
0
0

These days, it’s hard to keep track of all the companies that are trying to break into the home automation market. Whether they’re rebrands of somebody else’s product or completely new creations, it seems like every company has at least a few “smart” gadgets for you to choose from. We hadn’t heard of the Yokis devices that [Nicolas Maupu] has been working on before today, but thanks to his efforts to reverse engineer their protocol, we think they might become more popular with the hacking crowd.

Even if you don’t have a Yokis MTV500ER dimmer or MTR2000ER switch of your own, we think the detailed account of how [Nicolas] figured out how to talk to these devices is worth a read. His first step was to connect his oscilloscope directly to the SPI lines on the remote to see what it was sending out. With an idea of what he was looking for, he then used an nRF24L01+ radio connected to an ESP8266 to pull packets out of the air so he could analyze their structure. This might seem like a very specialized process, but in reality most of the techniques demonstrated could be applicable for any unknown communications protocol of which you’ve got a hex dump.

On the other hand, if you do have some of these devices (or plan to get them), then the software [Nicolas] has put together looks very compelling. Essentially it’s an interactive firmware for the ESP8266 that allows it to serve as a bridge between the proprietary Yokis wireless protocol and a standard MQTT home automation system. When the microcontroller is connected to the computer you get a basic terminal interface that allows you to scan and pair for devices as well as toggle them on and off.

This bridge could be used to allow controlling your Yokis hardware with a custom handheld remote, or you could follow the example of our very own [Mike Szczys], and pull everything together with a bit of Node-RED.

New Part Day: LED Driver is FPGA Dev Board in Disguise

$
0
0

Our new part of the day is the ColorLight 5A-75B, a board that’s meant to drive eight of those ubiquitous high-density color LED panels over gigabit Ethernet. If you were building a commercial LED wall, you’d screw a bunch of the LED panels together, daisy-chain a bunch of these boards to drive them, supply power, and you’d be done. Because of that high-volume application, these boards are inexpensive, around $15 each, and available as quickly as you can get stuff shipped from China.

But we’re not here to talk commercial applications. Managing fast Ethernet and pushing so many pixels in real time is a task best handled by an FPGA, and [Tom Verbeure] noticed that these things were essentially amazing FPGA development boards and started hacking on them. [q3k] put it up on GitHub, and you can follow along with the chubby75 reverse engineering project to dig into their secrets.

While the first generations of these boards used the old-standby Spartan 6, things got interesting for fans of open FPGA tools when newer versions were found using the Lattice ECP5-25 chips, the little brother of the stonking big chip [Sprite_TM] used on the 2019 Hackaday Supercon badge. If you want to grab one you’re looking for ColorLight boards marked with revision 6 or 7 as of this writing.

What does this mean? For the price of a gourmet hamburger, you get an FPGA that’s big enough to run a RISC-V softcore, two 166 MHz, 2 MB SDRAMS, flash for the FPGA bitstream, a bazillion digital outputs on 5 V level shifters, and two gigabit Ethernet ports. The JTAG port is broken out in 0.1″ headers, and it works with OpenOCD, which is ridiculously convenient. How’s that for a well-stocked budget FPGA dev board that’s served by a completely open toolchain?

Hackers at Work

The reverse engineering work on the ECP5 variants is still in progress, but there are some really heavy hitters in the open FPGA scene playing around with this board right now, and progress is being made rapidly.

Last week, to map out the new ECP5 variants’ pinouts, [Mike Walters] used a particularly sweet hack that he learned from [Claude Schwarz] that plays to the strengths of an FPGA: bit-bang serial UART with the pin number on all of the pins simultaneously. Each pin on the output headers then told him which pin on the FPGA it was attached to. Great idea!

[Florent] of Enjoy Digital got a picoRV core up and running with Ethernet UART just yesterday.

What would you do with one of these beasts? Obviously, drive many, many LEDs. (Here are two great references for Hub75 LEDs: one for Arduino, and one for Raspberry Pi. [Nick Poole] over at Sparkfun also has a nice deep-dive.) But there are other uses for high-bandwidth, real-time outputs. Control an arbitrary number of servo motors over Ethernet? Or heck, steppers! Myself, I’m not so much interested in the Ethernet as the memory and pinout, but you have to admit that an Ethernet bitstream bootloader would be an awesome hack.

Konrad Beckmann’s Pergola: Too many ECP5 boards, too little time!

While this is a reverse engineering effort — prying open a closed design — we’ve also seen great open-source hacker FPGA boards flourishing in the last few years. From the early Dipsy and Upduino projects, through TinyFPGA, BlackIce, and the iCEBreaker, to the super-recent Pergola and [Greg Davill]’s OrangeCrab and ButterStick, you’re not hurting for choice in dev boards if you don’t want to hang out on the bleeding edge with a Chinese LED driver.

If you are just starting out with FPGAs, you can support these awesome developers and it will more than pay you back in time spent: they’re all open, documented, and tested. I’m sure I’ve missed more than a few awesome boards as well — these are just the ones that I’ve had in my own two hands. (Post your favorites in the comments!)

But if twin Ethernets, a bunch of RAM, and too many 5 V outputs are the peripherals you need for your FPGA project, or if you just want to lend a hand to the development effort, the ColorLight 5A-75B might just be worth the hack. You certainly can’t beat the price.

The Multiyear Hunt for a Gameboy Game’s Bug

$
0
0

[Enddrift] had a real problem trying to run a classic game, Hello Kitty Collection: Miracle Fashion Maker, into a GBA (Gameboy Advance) emulator. During startup, the game would hit an endless loop waiting for a read from a non-existent memory location and thus wouldn’t start under the emulator. The problem is, the game works on real hardware even though that memory doesn’t exist there, either.

To further complicate things, a similar bug exists when loading a saved game under Sonic Pinball Party. Then a hack for Pokemon Emerald surfaced that helped break the case. The story is pretty interesting.

You can read the details in the original post, but the upshot was that reading an invalid address on a GBA just reads the open bus because the device doesn’t have a memory management unit to throw a page fault — known in that world as a data abort. Turns out, you’d expect an open bus to read the last value you’d read or written — either some data or the last instruction fetch. But it is more complicated than that.

The code was reading ghost values not from the last CPU memory read and write, but from the last DMA cycle! The workaround is clever, too, since it compares the expected end of the DMA time with the current instruction and forces it to read the right value.

A great piece of detective work. We aren’t sure we are lining up to play Hello Kitty, but it is nice to know that we could. Especially if we had an emulator inside our real device. If your hacking desires run more to real hardware, we would suggest this FPGA project.

Xbox Controller Provides Intro to SWD Hacking

$
0
0

It’s amazing to see how much technology is packed into even the “simple” devices that we take for granted in modern life. Case in point, the third party Xbox controller that [wrongbaud] recently decided to tear into. Not knowing what to expect when he cracked open its crimson red case, inside he found an ARM Cortex microcontroller and a perfect excuse to play around with Serial Wire Debug (SWD).

Though even figuring out that much took a bit of work. As is depressingly common, all the interesting components on the controller’s PCB were locked away behind a black epoxy blob. He had no idea what chip was powering the controller, much less that debugging protocols it might support. But after poking around the board with his multimeter, he eventually found a few test points sitting at 3.3 V which he thought was likely some kind of a programming header. After observing that pulling the line labelled “RES” low reset the controller, he was fairly sure he’d stumbled upon a functional JTAG or SWD connection.

The Serial Wire Debug architecture.

As [wrongbaud] explains in his detailed blog post, SWD is something of a JTAG successor that’s commonly used by ARM hardware. Using just two wires (data and clock), SWD provides hardware debugging capabilities on pin constrained platforms. It allows you to step through instructions, read and write to memory, even dump the firmware and flash something new.

For the rest of the post, [wrongbaud] walks the reader through working with an SWD target. From compiling the latest version of OpenOCD and wiring an FTDI adapter to the port, all the way to navigating through the firmware and unlocking the chip so you can upload your own code.

To prove he’s completely conquered the microcontroller, he ends the post by modifying the USB descriptor strings in the firmware to change what it says when the controller is plugged into the computer. From here, it won’t take much more to get some controller macros like rapid fire implemented; a topic we imagine he’ll be covering in the future.

This post follows something of a familiar formula for [wrongbaud]. As part of his continuing adventures in hardware hacking, he finds relatively cheap consumer devices and demonstrates how they can be used as practical testbeds for reverse engineering. You might not be interested in changing the ROM that a Mortal Kombat miniature arcade cabinet plays, but learning about the tools and techniques used to do it is going to be valuable for anyone who wants to bend silicon to their will.

Teardown: Cobra XRS 9740 Radar Detector

$
0
0

Drivers with a lead foot more often than not have Waze open on their phone so they can see if other drivers have spotted cops up ahead. But avoiding a speeding ticket used to involve a lot more hardware than software. Back before the smartphone revolution, that same driver would have had a radar detector on their dashboard. That’s not to say the gadgets are completely unused today, but between their relatively high cost (one of the top rated models on Amazon as of this writing costs over $300) and the inevitable false positives from so many vehicles on the road having their own radar and LIDAR systems, they’ve certainly become a less common sight over the years

The subject of today’s teardown is a perfect example of “Peak Radar Detector”. Manufactured back in 2007, the Cobra XRS 9740 would have been a fairly mid-range entry offering the sort of features that would have been desirable at the time. Over a decade ago, having an alphanumeric display, voice alerts, and a digital compass were all things worth shouting about on the box the thing was sold in. Though looking like some kind of Cardassian warship was apparently just an added bonus.

As the name implies these devices are primarily for detecting radar activity, but by this point they’d also been expanded to pick up infrared lasers and the strobe beacons on emergency vehicles. But false positives were always a problem, so the device allows the user to select which signals it should be on the lookout for. If you were getting some kind of interference that convinced the detector it was being bombarded with IR lasers, you could just turn that function off without having to pull the plug entirely.

But it’s important to remember that this device was built back when people were still unironically carrying around flip phones. Detecting laser and multi-band radars might sound like something pulled from the spec sheet of a stealth fighter jet, but this is still a piece of consumer electronics from more than a decade in the past. So let’s crack it open and take a look at what goes on inside a radar detector that’s only a few years away from being old enough to get its own driver’s license.

The Horn of Plenty

With the Cobra’s case open the largest and most obvious component is, as you might have guessed, the radar detector itself. Or more accurately, the metallic waveguide of the detector. This structure, often called the “horn” for fairly obvious reasons, funnels the radar waves down into the detector circuitry. You’ll note here that there’s only a single wave guide, and it faces forward; this unit would have limited ability to detect radar from any other direction than directly ahead, which was typical until they started adding more wave guides on higher end models later on.

Another interesting note are the set screws directly behind the horn. These allow adjusting the resonant frequency of the detector cavity, and once they were set to the appropriate lengths at the factory, an adhesive was applied to the top to make sure they didn’t rotate from vibration. Upon opening the wave guide itself, you can see that the length of these screws actually varies wildly. Combined with the fact that there are open holes for additional unused screws to be installed in, it would seem that there was considerable variation between detectors that needed to be manually addressed during the QA process.

Behind the set screws and located 90 degrees from the face of the horn itself is the superheterodyne receiver. According to the manual it can detect frequencies from the X band at 10.5 GHz all the way up to Ka band at 34.7 GHz. Owing to the amount of high frequency RF Dark Arts that are happening on this 20 mm long board, the construction techniques and even the substrate used on this PCB are markedly different from the rest of the device.

Seeing the Light

Located under a shield slightly smaller than the radar waveguide housing is the infrared laser detector. This component is actually a separate module, complete with a header that allows it to be easily swapped out once the screws holding it down are removed. It could be that laser detection technology was considered such a moving target at the time that Cobra wanted to keep it as a separate module, allowing them to potentially improve that particular capability down the line without having to redesign the entire board. It’s also possible that a cheaper version of the Cobra XRS 9740 was available that didn’t have the laser capability. In either event, it would be interesting to take a peek inside of other detectors from the era to see if this was a common trait.

The main components on this module are the PIC12F629 microcontroller on the far left and BA10358 operational amplifier to the right of it. Unfortunately the dual IR detectors, one mounted on the front of the board to align with the radar horn and the other mounted flat on its back and facing a lens assembly on the top of the device, don’t have any identifying markings. That said, the two-pin sensors look suspiciously like the sort of IR detectors you’d see in an old mouse.

Valuable Treasure

The display aficionados in the audience have been waiting patiently, and now it’s their turn. Along the back edge of the Cobra XRS 9740, diffused with a piece of smoked black plastic, is an absolutely gorgeous eight character alphanumeric LED display in that perfect shade of Matrix green.

It turns out this is a HCMS-2973, a well documented display that’s even supported by a couple of Arduino libraries. These are normally pretty pricey, selling for $10 to $20 used and currently listed for $36 a pop on Digi-Key. That’s more than these old radar detectors often go for on eBay (to say nothing of flea market finds), so if you don’t mind spending some quality time with the desoldering wick, you could potentially turn a profit just by snapping up old detectors and reselling their screens.

In this case the HCMS-2973 lives on a small daughter-board that allows it to be mounted vertically. The fine people at Cobra even went through the trouble of sorting out the display’s somewhat unusual pin arrangement and broke out the five lines you need to actually drive it to solder pads along the edge of the board. Very thoughtful of them.

Potential for Greatness

On the flip side of the Cobra’s main PCB, we find a relatively familiar face: an ATmega644 microcontroller. Next to the 44-pin TQFP packaged chip are helpfully labeled JTAG points and what appears to be an unpopulated programming header.

Seeing not one but two recognizable microcontrollers is certainly refreshing considering how many miserable epoxy blobs we run into these days. Admittedly there aren’t a lot of folks chomping at the bit to hack a radar detector from the early 2000s, but assuming there was sufficient interest, let’s theorize a bit here.

Following the traces, the PIC in the laser module is connected directly to the I/O pins on the ATmega. A logic analyzer placed between them should reveal in relatively short order whatever whispered secrets the pair of microcontrollers are sharing with each other. That’s half of the device’s functionality right there. Getting the display working wouldn’t be a problem either, the HCMS-2973 is a standard component, and it to can be traced directly back to the pins on the ATmega.

So what stands between the Cobra XRS 9740 and an open source replacement firmware for freedom-loving speedsters? Well, the big chip labeled “MCS LOGIC COBRA” might have something to say about it.

Any effort to create a custom firmware for the device would have to involve reverse engineering whatever this chip is doing. If Cobra went through the trouble of getting the chips manufactured, especially in a device that otherwise doesn’t seem to have a problem using off-the-shelf components, it’s probably used for some radar groking magic they wanted to keep close to the vest.

Of course, this is a bit of an oversimplification. There’s a handful of other unidentified chips lurking around the PCB that would need to be dealt with as well. Getting the classic “Hello World” running on the display might only be an afternoon’s worth of tinkering, but the difficulty really ramps up from there. If anyone feels like challenging themselves, it seems like there’s enough pieces here to conduct a fascinating open source experiment. Ultimately it might just boil down to how far a free software fanatic is willing to go keep the Smokey off his tail.

A NES Motherboard For The Open Source Generation

$
0
0

As the original hardware from the golden era of 8-bit computer gaming becomes a bit long in the tooth, keeping it alive has become something of a concern for enthusiasts. There have been a succession of remanufactured parts for many of the major platforms of the day, and now thanks to [Redherring32] it’s the turn of the NES console.

The OpenTendo is a completely open-source replacement for an original front-loading Nintendo Entertainment System motherboard, using both original or after-market Nintendo CPU and PPU chips, and other still readily available components. It doesn’t incorporate Nintendo’s CIC lockout chip — Drew Littrell wrote a great article on how that security feature worked — but if you really need the authenticity there is also the NullCIC project that can simulate that component.

It’s an interesting exercise in reverse engineering as well as a chance to look at the NES at the chip level. Also for Nintendo-heads, it provides all the component footprints and schematic items in KiCAD format. Will many be built? Given that the NES was the best-selling console of its time there should be no shortage of originals to be found, but that in no way invalidates the effort put into this project. There will be NES consoles somewhere running for decades to come because of work such as this, simply remember that you don’t need to blow in the slot to make it work!

Subwoofer Gets Arduino Brain Transplant

$
0
0

The Samsung PS-WTX500 subwoofer is designed to be used as part of a 5.1 channel home theater system, but not just any system. It contains the amplifiers for all the channels, but they’ll only function when the subwoofer is connected to the matching receiver. [Alejandro Zarate] figured there must be some way to unlock the system’s full functionality without being limited to the original receiver, he just needed to reverse engineer how the subwoofer worked.

All the wires tuck underneath the Arduino

The result is a fantastically well documented write-up that covers the whole process, starting with how [Alejandro] identified and researched the Pulsus PS9829B Digital Audio Processor (DAP). Documentation for this particular chip seems hard to come by, but he was able to find a similar chip from the same manufacturer that was close enough to put him on the right track. From there, he started studying the SPI communications between the DAP and the subwoofer’s S3P70F4 microcontroller.

After analyzing the communication between the two chips, [Alejandro] pulled the S3P70F4 off the board and wired an Arduino Pro Mini 328 in its place. The Arduino was quite a bit larger than the original microcontroller, but with some careful wiring, he manged a very professional looking installation. Short of coming up with a custom PCB adapter, we don’t think it could look much better.

With some relatively straightforward code and a listing of the captured byte sequences, the Arduino was able to power up the PS-WTX500’s amplifiers and handle the incoming audio signal as a stand-alone device.

In the past we’ve seen a similar trick done with the ESP8266, which had the added benefit of enabling WiFi control of the speakers. We’re all for adding modern functionality to older hardware, even if you’ve got to hang it off the back as an external module.


Linux Fu: Tracing System Calls

$
0
0

One of the nice things about Linux and similar operating systems is that you can investigate something to any level you wish. If a program has a problem you can decompile it, debug it, trace it, and — if necessary — even dig into the source code for the kernel and most of the libraries the program is probably using. However, the tools to do this aren’t ones you use every day. One very interesting tool is strace. Using it you can see what system calls any program makes and that can sometimes give you important clues about how the program works or, probably more often, why it doesn’t work.

Let’s consider the least complex use of the command. Suppose you want to make symlink from testxmit.grc to the /tmp directory. That command is simple:

ln -sf testxmit.grc /tmp

But if you tell strace to run it, the command becomes:

strace ln -sf testxmit.grc /tmp

You might want to redirect the output to a file using the shell or the -o option, though. Some commands generate a lot and often the first page or two of output isn’t really what you care about anyway.

Let’s Look

Let’s look at the output:

execve("/bin/ln", ["ln", "-sf", "testxmit.grc", "/tmp"], 0x7fff51ddf6f8 /* 91 vars */) = 0
brk(NULL) = 0x562301ce6000
... 
openat(AT_FDCWD, "/usr/lib/locale/locale-archive", O_RDONLY|O_CLOEXEC) = 3
fstat(3, {st_mode=S_IFREG|0644, st_size=3004096, ...}) = 0
mmap(NULL, 3004096, PROT_READ, MAP_PRIVATE, 3, 0) = 0x7f7c45298000
close(3) = 0
stat("/tmp", {st_mode=S_IFDIR|S_ISVTX|0777, st_size=1360, ...}) = 0
lstat("/tmp/testxmit.grc", 0x7fff7ae555d0) = -1 ENOENT (No such file or directory)
symlinkat("testxmit.grc", AT_FDCWD, "/tmp/testxmit.grc") = 0
lseek(0, 0, SEEK_CUR) = -1 ESPIPE (Illegal seek)
close(0) = 0
close(1) = 0
close(2) = 0
exit_group(0) = ?
+++ exited with 0 +++

At the top, shortened here, are 25 lines dealing with loading shared libraries into the memory space and four lines dealing with locales. I put the first “real” line in bold, where the program calls stat on /tmp and then makes sure the file doesn’t already exist. Finally, you get to the real system call (symlinkat) followed by a few things to close the program out. A lot of work to get to one system call.

You can probably figure out that the part on the left of the equal sign is the return value of the call. Usually, zero is success and other numbers mean different things. However, the openat call, for example, returns a file descriptor (3) and you can see it sent to fstat in the next line.

In Practice

Of course, the ln command works, but humor me and say we were wanting to understand what arguments passed to symlinkat. You could use the -e option to cut the output down to size:

strace -e symlinkat ln -sf testxmit.grc /tmp

You’ll notice something strange if you did the examples in order. The second time you run the command you get two calls to symlinkat. The first one fails because the file already exists. The second one is to some random file name. Taking off the -e lets you see everything (I’m only showing the interesting part):

symlinkat("testxmit.grc", AT_FDCWD, "/tmp/testxmit.grc") = -1 EEXIST (File exists)
openat(AT_FDCWD, "/dev/urandom", O_RDONLY) = 3
read(3, "\337\336\10\324\254\233", 6)   = 6
close(3)                                = 0
getpid()                                = 29340
getppid()                               = 29338
getuid()                                = 1000
getgid()                                = 1000
symlinkat("testxmit.grc", AT_FDCWD, "/tmp/CuzoNWnv") = 0
renameat(AT_FDCWD, "/tmp/CuzoNWnv", AT_FDCWD, "/tmp/testxmit.grc") = 0

Notice that the random part comes from reading some data from /dev/urandom. If you don’t want all that output, try:

strace -e synlinkat,renameat ln -sf testxmit.grc /tmp

Other Options

The -p option lets you supply a PID of a running program. Sending the output to a file and then monitoring the file with a tail -f is a good trick. By default, you only see 32 bytes of the call data and that might not be enough. You can adjust that size with the -s option.

So far we’ve only looked at simple programs. But if you want to trace multiple threads, check out the -f and -ff options.

If you want a survey of what the program is calling, the -c option will give you a summary.

% time     seconds  usecs/call     calls    errors syscall
------ ----------- ----------- --------- --------- ----------------
  0.00    0.000000           0         2           read
  0.00    0.000000           0         7           close
  0.00    0.000000           0         2           stat
  0.00    0.000000           0         3           fstat
  0.00    0.000000           0         1           lstat
  0.00    0.000000           0         1         1 lseek
  0.00    0.000000           0         6           mmap
  ...
  0.00    0.000000           0         4           openat
  0.00    0.000000           0         1           renameat
  0.00    0.000000           0         2         1 symlinkat
------ ----------- ----------- --------- --------- ----------------
100.00    0.000000                    46         5 total

Of Course, There’s More…

This is just one of many tools you can use to examine Linux programs. Debuggers are often useful, especially if you have the source. There are other tools to examine symbol tables and dump executables. But those are topics for another time.

What’s your favorite Linux reverse engineering tool? Let us know in the comments.

A Hacker’s Guide to JTAG

$
0
0

If you’re reading Hackaday, you’ve almost certainly heard of JTAG. There’s an excellent chance you’ve even used it once or twice to reflash an unruly piece of hardware. But how well do you actually know JTAG? More specifically, do you know how useful it can be when reverse engineering hardware?

Whether you’re a JTAG veteran or a novice, this phenomenal guide written by [wrongbaud] is sure to teach you a thing or two. Starting with a low-level explanation of how the interface actually works, the guide takes you though discovering JTAG ports on unknown targets, the current state-of-the-art in open source tools to interact with the device, and finally shows a real-world example of pulling and analyzing a gadget’s firmware.

There’s no way to do his write-up justice with a breakdown or a summary, so we won’t even try. Just get comfortable, maybe grab a drink, and dive in. It’s certainly not a short read, but there isn’t a wasted word on the page. Every piece of the puzzle, from how to figure out an unlabeled pinout to determining the instruction length, is explained in exactly the amount of detail you’re looking for. This is a guide for hackers written by a hacker, and it shows.

It will probably come as no surprise to find this isn’t the first time [wrongbaud] has done a deep dive like this. Over the last few months we’ve been covering his series of practical reverse engineering guides, and each one has been an invaluable resource. Perfect study guides for when a global pandemic has you stuck in the house.

Bike Lock Secures Car

$
0
0

[Buttim] loses his car a lot, which might sound a little bit like the plot from an early-00s movie, but he assures us that it’s a common enough thing. In a big city, and after several days of not driving one’s car, it can be possible to at least forget where you parked. There are a lot of ways of solving this problem, but the solution almost fell right into his lap: repurposing a lock from a bike share bicycle. (The build is in three parts: Part 2 and Part 3.)

These locks are loaded with features, like GPS, a cellular modem, accelerometers, and in this case, an ARM processor. It took a huge amount of work for [Buttim] to get anything to work on the device, but after using a vulnerability to dump the firmware and load his own code on the device, spending an enormous amount of time trying to figure out where all the circuit traces went through layers of insulation intended to harden the lock from humidity, and building his own Python-based programmer for it, he has basically free reign over the device.

To that end, once he figured out how it all worked, he put it to use in his car. The device functions as a GPS tracker and reports its location over the cellular network so it can’t become lost again. As a bonus, he was able to use the accelerometers to alert him if his car was moving without him knowing, so it turned into a theft deterrent as well. Besides that, though, his ability to get into the device’s firmware reminded us of a recent attempt to get access to an ARM platform.

Reverse Engineering an RGB Keyboard Under Linux

$
0
0

Hardware support under Linux is far better than it ever has been in the past. These days, most things “just work” out of the box, and you probably won’t have to compile any custom kernel modules. Certainly a far cry from where things were a decade ago. But that doesn’t mean everything will work to 100% of its abilities. Take for example, the Duck keyboard that [Cynthia Revström] has. Sure it works as a basic keyboard under any OS, but getting those fancy RGB LEDs working is another story entirely.

Don’t get the wrong idea here, [Cynthia] isn’t just trying to get the keyboard to flash along to music; the goal was to use the RGB lighting of the Ducky keyboard for notifications that the user can’t possibly ignore. Even the most laser-focused among us would have a hard time not noticing that the entire keyboard is blinking red. But the “DuckyRGB” software that you need to do something like that is Windows-only and apparently distributed via a sketchy Google Drive link. Yikes.

The first step to creating an alternative was to spin up a Windows VM and install DuckyRGB. From there, Wireshark could listen in between the virtual computer and the Ducky keyboard to see what the software was sending over the wire. After identifying a version number being sent in the clear, [Cynthia] was able to isolate the LED commands by searching for the hex color codes. From there, it was a relatively simple matter of writing some glue code to connect it up to an alert service and get notifications going.

There was only one problem; the keyboard didn’t work anymore. Turns out the tool that [Cynthia] wrote to control the keyboard’s LEDs was claiming the device so the kernel couldn’t access it for normal input. It took a detour with HIDAPI to get everyone playing together nicely, and now changing the color of your Ducky keyboard on Linux doesn’t turn it into a paperweight.

Even if you don’t have a Ducky keyboard, or aren’t particularly interested in having its LEDs blinked at you if you do, this project is a phenomenal example of practical USB reverse engineering. [Cynthia] says the inspiration for this project came from friend [Ben Cox], who’s write-up on creating USB userspace drivers we covered last year. If you’ve got and old USB gadget with Windows-only drivers, maybe it’s time you take a crack at unlocking it.

Reverse Engineering a Saab’s In-Dash Display

$
0
0

For [Leigh Oliver], there’s something undeniably appealing about the green on black instrumentation of the 2003 Saab 9-3 Gen2. Perhaps it’s because the Infotainment Control Module 2 (ICM2) screen brings a bit of that classic Matrix vibe to the daily commute. Whatever the reason, it seemed the display deserved better than to be stuck showing the nearly 20 year old stock user interface. Luckily, you can control it via I2C.

Though as you might expect, that fact wasn’t obvious at first. [Leigh] had to start by taking the ICM2 apart and reverse engineering the display board. With a multimeter and high resolution photographs of both sides of the PCB, all of the traces were mapped out and recreated in KiCAD. This might not have been strictly necessary, but it did serve as good practice for using KiCAD; a worthwhile tip for anyone else looking to build practical experience creating schematics.

With everything mapped out, [Leigh] was able to connect a BusPirate V3 up to the board and pretty quickly determine it was using I2C to control the display. As far as figuring out how to repurpose existing displays goes, this was perhaps the best possible scenario. It even allowed for creating a display library based on Adafruit_GFX which offers graphical capabilities far beyond what the ICM2 module itself is capable of.

Even with so much progress made, this project is really just getting started. [Leigh] has managed to put some impressive imagery on the black and green Saab display, but the hardware side of things is still being worked on. For example, there’s some hope that an I2C multiplexer would allow the display to easily and quickly be switched between “stock” mode and whatever enhanced version comes about thanks to the new libraries and an ESP8266 hiding behind the dashboard.

If you don’t have a sufficiently vintage Saab to take advantage of this project, don’t worry. Tapping into the OBD port with an OLED display can get you similar results on a wide range of vehicles.

How To Keep Unique Equipment Running When Parts Run Out

$
0
0

[JGlass] deals with public-facing technology, which he says includes things like theatre equipment, retail displays, and museum displays. Many of these pieces of technology are literally one-of-a-kind devices, even if they were constructed from what was once off-the-shelf, commercially available parts. When these machines need servicing, replacement parts aren’t always available, and reverse engineering comes in handy. He recently began documenting exactly how to approach this process by using the identification and replacement of an obsolete 7-segment industrial display as an example.

The particular part shown is the Lascar EM32-4-LED, which up and died in a unique piece of equipment. The trouble is that the EM32-4-LED is out of production and unobtainable, and the Programmable Logic Controller (PLC) that drives the whole thing is a black box that cannot be modified. It’s very good news that a datasheet exists, but that’s often just a starting point. To create a one-off, drop-in solution requires a combination of research, troubleshooting, and design work.

To do this, [JGlass] starts off by walking through datasheet elements and explains that it’s important to build a high level understanding of function first, then drill down into details, and always be ready to verify, challenge, or throw out one’s assumptions. After establishing a high level understanding comes matching physical evidence to things like block and functional diagrams, then cracking open the faulty component to see if anything else can be learned. Only then are multimeters and probes taken out for more active research. All of this sleuthing must always be done with the end goal firmly in mind: creating a new device that acts like the one being replaced. Without focus, one can easily get lost in details and unknowns.

Reverse Engineering is a process, and the more tools, the better. If you missed our earlier post about a hacker’s guide to JTAG, here’s your chance to check it out and be all the more prepared for the next time you need to do some electron detective work of your own.

Brain Transplant Makes One Arcade Machine Play Games From Another

$
0
0

We’re used to games consoles in which the same hardware plays a variety of different games, but if we were to peer inside arcade cabinets of an older vintage we’d find custom boards unique to every game. Some boards from the same manufacturers shared common hardware traits even if they weren’t identical though, and [twistedsymphony] has taken advantage of this to make one vintage Taito game — Gun & Frontier — run on the hardware for another, Ah Eikou no Koshien. It’s a fascinating tale across a forum thread, that’s well worth a read even if you will never touch a vintage arcade board.

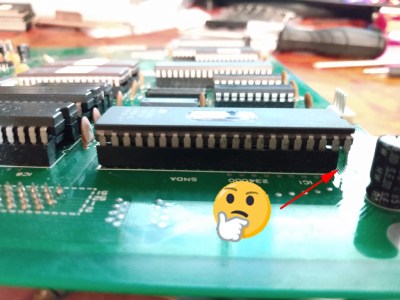
We might expect that the tool of choice would be a logic analyser or similar, but unexpectedly the solution to this hack was found in MAME. The arcade emulator conceals a wealth of information about these boards, from which you can discover their differences and try out possible solutions. The hardware hacks are surprisingly straightforward, a few bodge wires and an extra address line for a larger ROM. A programmable logic array required dumping and rewriting to fix a graphics corruption issue and a little bit of ROM tweaking after emulating a controller problem in MAME was required, but it seems that yes, one game can run on another. Certainly less painful than the Taito hack that required a chip to be decapped.

[via r/ReverseEngineering]


Reverse Engineering Saves Trashed LED Panels

$
0
0

While out riding his bike, [Hammond Pearce] came across a dumpster overflowing with large LED panels. Despite the fact that the model numbers didn’t reveal anything helpful after some online searching, he decided to pedal off with as many as he could safely carry. The COVID-19 lockdown left him with only a limited set of tools, be he still managed to crack the protocol used to control his e-waste score and document it for our reading pleasure.

Between the helpful labels on the PCB silkscreen and the advice of a friend that used to work on digital road signs, it didn’t take [Hammond] long to get a general idea of what the panels were looking for in terms of power and control. Especially once he noticed the MBI5024 shift registers dotting the board.

The next step was to take an ATmega328PB based development board and start throwing data at the panel’s input lines to see if he could elicit a response. With careful attention and some custom code, he eventually figured out that each byte of data sent down the line would control a 4 x 2 section of LEDs.

Once he had the basics down, the next step was to start expanding his code to handle things like shapes, text, and daisy-chained panels. After posting some of his work to Reddit, cyber-sleuths determined that the protocol appeared to be some variation of HUB75, which gave [Hammond] hints on what some of the other pins in the connector might be used for. He’s released all of his code online for anyone who might find it useful, but since he still doesn’t know who made these panels and why there’s really no telling how many of them are actually floating around out there.

Figuring out how to talk to an unknown or undocumented piece of hardware can be intimidating, but success stories like these are reminders of why it’s worth putting the effort in. As we’ve seen, the difference between trash and treasure is often a keen eye and a few lines of code.

Poking Around Inside of a Linux Security Camera

$
0
0

This deep dive into the Linux-powered Reolink B800 IP camera started because of a broken promise from its manufacturer. When [George Hilliard] purchased a kit that included six of the cameras and a video recorder, the website said they were capable of outputting standard RTSP video. But once he took delivery of the goods, and naturally after his return window had closed, the site was updated to say that the cameras can only function with the included recorder.

Taking that as something of challenge, [George] got to work. His first big break came when he desoldered the camera’s SPI flash chip and replaced it with a socket. That allowed him to easily take the chip out of the device for reading and flashing as he tinkered with modifying the firmware. After adding cross-compiled versions of busybox, gdb, and strace to the extracted firmware, he bundled it back up and flashed it back to the hardware.

If you think that’s the end of the story, it isn’t. In fact, it’s just the beginning. While getting root-level access to the camera’s OS would have potentially allowed for [George] to dump all the proprietary software it was running and replace it with open alternatives, he decided to take a different approach.

Instead of replacing the camera’s original software, he used his newly granted root powers to analyze it and figure out how it worked. This allowed for to sniff out some very suspect “encryption” routines built into the software, and eventually write his own server side in Rust that finally allowed him to use the cameras with his own server…albeit with a bit more work than he bargained for.

Projects like these are a fantastic look at real world reverse engineering, and a reminder that sometimes achieving your ultimate goal means taking the long way around. Even if you’re not in the market for a hacked security camera, there’s no doubt that reading the thorough write-up [George] has prepared will teach you a few things. But of course, we’d expect no less from a guy who runs Linux on his business card.

Looking for Pi in the 8087 Math Coprocessor Chip

$
0
0

Even with ten fingers to work with, math can be hard. Microprocessors, with the silicon equivalent of just two fingers, can have an even harder time with calculations, often taking multiple machine cycles to figure out something as simple as pi. And so 40 years ago, Intel decided to give its fledgling microprocessors a break by introducing the 8087 floating-point coprocessor.

If you’ve ever wondered what was going on inside the 8087, wonder no more. [Ken Shirriff] has decapped an 8087 to reveal its inner structure, which turns out to be closely related to its function. After a quick tour of the general layout of the die, including locating the microcode engine and ROM, and a quick review of the NMOS architecture of the four-decade-old technology, [Ken] dug into the meat of the coprocessor and the reason it could speed up certain floating-point calculations by up to 100-fold. A generous portion of the complex die is devoted to a ROM that does nothing but store constants needed for its calculation algorithms. By carefully examining the pattern of NMOS transistors in the ROM area and making some educated guesses, he was able to see the binary representation of constants such as pi and the square root of two. There’s also an extensive series of arctangent and log2 constants, used for the CORDIC algorithm, which reduces otherwise complex transcendental calculations to a few quick and easy bitwise shifts and adds.

[Ken] has popped the hood on a lot of chips before, finding butterflies in an op-amp and reverse-engineering a Sinclair scientific calculator. But there’s something about seeing constants hard-coded in silicon that really fascinates us.

Learn the Secrets of Matching Bottle Cap Threads To One Another

$
0
0

Do you want to design something to match existing threads on a bottle, or a cap? It turns out there’s an easier way than reaching tiredly for the calipers and channeling one’s inner reverse-engineer. Bottle cap threads — whose industry term is the neck finish — aren’t arbitrary things; they are highly standardized, and [Noupoi] researched it all so that you don’t have to! The Bottle Cap Thread Calculator takes a few key measurements and spits out everything needed to model exact matches. Need some guidance on how exactly to use the information the calculator spits out? There is a handy link to a Fusion360 tutorial on creating bottle threads (YouTube video) to demonstrate.

This all came from [Noupoi] wanting to model an adapter to transfer the contents of one bottle to another, smaller bottle. By identifying which thread was used on each bottle, the job of modeling a matching adapter was much easier. It turns out that the bottle necks were an SP 28-415 (larger) and a 24-415 (smaller), and with that information the adapter was far simpler to design. If you want to check the adapter out, it’s available on Thingiverse.

If truly reverse-engineering bottle threads is needed, here’s a method we covered that involves making a simple cast and working from that.

[via Reddit]

High-End Ham Radio Gives Up Its Firmware Secrets

$
0
0

Amateur radio operators have always been at the top of their game when they’ve been hacking radios. A ham license gives you permission to open up a radio and modify it, or even to build a radio from scratch. True, as technology has advanced the opportunities for old school radio hacking have diminished, but that doesn’t mean that the new computerized radios aren’t vulnerable to the diligent ham’s tender ministrations.

A case in point: the Kenwood TH-D74A’s firmware has been dumped and partially decoded. A somewhat informal collaboration between [Hash (AG5OW)] and [Travis Goodspeed (KK4VCZ)], the process that started with [Hash]’s teardown of his radio, seen in the video below. The radio, a tri-band handy talkie with capabilities miles beyond even the most complex of the cheap imports and with a price tag to match, had a serial port and JTAG connector. A JTAGulator allowed him to probe some of the secrets, but a full exploration required spending $140 on a spare PCB for the radio and some deft work removing the BGA-packaged Flash ROM and dumping its image to disk.

[Travis] picked up the analysis from there. He found three programs within the image, including the radio’s firmware and a bunch of strings used in the radio’s UI, in both English and Japanese. The work is far from complete, but the foundation is there for further exploration and potential future firmware patches to give the radio a different feature set.

This is a great case study in reverse engineering, and it’s really worth a trip down the rabbit hole to learn more. If you’re looking for a more formal exploration of reverse engineering, you could do a lot worse than HackadayU’s “Reverse Engineering with Ghidra” course, which just wrapping up. Watch for the class videos soon.

Viewing all 364 articles
Browse latest View live


Latest Images

<script src="https://jsc.adskeeper.com/r/s/rssing.com.1596347.js" async> </script>